
Wii U:Recovering from a CBHC brick: Difference between revisions
From Hacks Guide Wiki
More actions
Added diagnosing a CBHC brick and uninstalling CBHC. |
mNo edit summary |
||
| Line 1: | Line 1: | ||
=<big>Recovering from a CBHC brick</big>= | =<big>Recovering from a CBHC brick</big>= | ||
== <big>Diagnosing a CBHC brick (skip to Requirements if a helper linked you here)</big> == | ==<big>Diagnosing a CBHC brick (skip to Requirements if a helper linked you here)</big>== | ||
<big>A CBHC brick is when your console tries to boot to a missing title (the DS game that you used to inject Haxchi into). Here's what happens when you boot a CBHC bricked Wii U (in big lines).</big> | <big>A CBHC brick is when your console tries to boot to a missing title (the DS game that you used to inject Haxchi into). Here's what happens when you boot a CBHC bricked Wii U (in big lines).</big> | ||
# <big>You press the power button</big> | #<big>You press the power button</big> | ||
# <big>Wii U goes through all of its boot stages</big> | #<big>Wii U goes through all of its boot stages</big> | ||
# <big>Wii U tries to find the set "home" title</big> | #<big>Wii U tries to find the set "home" title</big> | ||
# <big>No "home" title found</big> | #<big>No "home" title found</big> | ||
# <big>160-0101</big> | #<big>160-0101</big> | ||
<big>And here you are now!... Let's get started for the guide.</big> | <big>And here you are now!... Let's get started for the guide.</big> | ||
| Line 64: | Line 64: | ||
#<big>Once you're back at the main menu, shutdown the console.</big> | #<big>Once you're back at the main menu, shutdown the console.</big> | ||
== <big>Uninstalling CBHC after recovering from a brick</big> == | ==<big>Uninstalling CBHC after recovering from a brick</big>== | ||
You may tell yourself why you couldn't use the CBHC uninstall guide on the main page. | <big>You may tell yourself why you couldn't use the CBHC uninstall guide on the main page.</big> | ||
Well, basically, there's no HBL anymore. | <big>Well, basically, there's no HBL anymore.</big> | ||
# Navigate to system settings and Data Management. | #<big>Navigate to system settings and Data Management.</big> | ||
# Go to wherever Haxchi was injected (generally your internal memory) | #<big>Go to wherever Haxchi was injected (generally your internal memory)</big> | ||
# Uninstall the app. '''It is completely safe to do so as you are not automatically booting into CBHC anymore.''' | #<big>Uninstall the app. '''It is completely safe to do so as you are not automatically booting into CBHC anymore.'''</big> | ||
<big><br /> | |||
And there you go! You've successfully unbricked your Wii U and uninstalled CBHC.</big> | |||
<big>You can now format your SD Card following [[Formatting an SD card|this guide]] to delete any CBHC traces. Don't forget to backup anything important.</big> | |||
<big>Follow [[wiiuguide:aroma/getting-started.html|this guide to install Aroma]] and optionally Tiramisu if you ever need to run older homebrew!</big> | |||
Follow [[wiiuguide:aroma/getting-started.html|this guide to install Aroma]] and optionally Tiramisu if you ever need to run older homebrew! | |||
[[Category:Wii U guides]] | [[Category:Wii U guides]] | ||
[[Category:Wii U]] | [[Category:Wii U]] | ||
[[Category:Wii U homebrew]] | [[Category:Wii U homebrew]] | ||
Latest revision as of 10:18, 16 May 2026
Recovering from a CBHC brick
Diagnosing a CBHC brick (skip to Requirements if a helper linked you here)
A CBHC brick is when your console tries to boot to a missing title (the DS game that you used to inject Haxchi into). Here's what happens when you boot a CBHC bricked Wii U (in big lines).
- You press the power button
- Wii U goes through all of its boot stages
- Wii U tries to find the set "home" title
- No "home" title found
- 160-0101
And here you are now!... Let's get started for the guide.
Requirements
- Preferably a modded Switch or Raspberry Pi Pico (see supported devices on the UDPIH page)
- A PC (preferably Windows but I think you can use any OS)
- An SD Card compatible with a Wii U (the one that you should have
Files to download
- UDPIH for your appropriate device (see supported devices)
- If you are using a Nintendo Switch, please download it using this link instead.
- recovery_menu
- https://github.com/GaryOderNichts/recovery_menu/releases
- If you don't get any TV output during this guide, please download
recovery_menu_dc_initinstead and rename it torecovery_menu
SD Preparation
- Put the downloaded
recovery_menuon the root of the SD Card.
Flash UDPIH to your device
If you are using a Pi Pico / Pico 2 / Any supported device that isn't a Switch
- Flash the appropriate file to the appropriate device. This part of the guide will be focusing on the Pi Pico 1 and 2 but any Linux based device with USB emulation should work.
- Hold the BOOTSEL button of your Pico while plugging it into the PC. It will show up as a flash drive with the following name:
RPI-RP2 - Drag and drop the correct .uf2 file inside of your Pico. Disconnect it and it will reboot. Do not turn it off from now on.
If you are using a modded Nintendo Switch (vulnerable to RCM)
- Open any RCM injector of your choice (the most popular ones are TegraRCMGui, JTegraNX and CrystalRCM).
- Put your switch into RCM mode
- Choose the .bin file for your Nintendo Switch and hit inject.
- A new screen should pop up with multiple buttons from a list. To select something, press Power. To navigate around, press the volume buttons.
On the Wii U
- Put the SD Card containing the
recovery_menuat the root of it. It must be formatted in FAT32. Follow this guide to format it correctly. - If you are using a Nintendo Switch, it is now time to Run the UDPIH gadget.
- Power on the Wii U. As soon as you see the Wii U logo, plug in the UPDIH device. It may take multiple tries, be patient.
- As soon as the light is purple, you should be good to go. The menu should've loaded but if you get a distorted screen or even no TV output, retry it. If still nothing, download
recovery_menu_dc_initas said in the 3rd step of Files to download.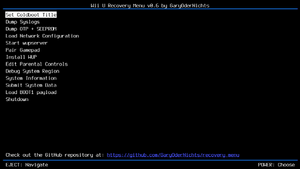
Main menu of Recovery_Menu.Credits to GaryOderNichts for this screenshot.Click the image to zoom! - Unlike in the minute menu, to navigate, you should use Eject and Power to select/choose an option.
- Select the
Set Coldboot Titleoption. - You should now see multiple options to set as your Coldboot title (which basically means what you want to boot to).
- Select the Wii U Menu of your appropriate console region:
Wii U Menu (JPN) - 00050010-10040000Wii U Menu (USA) - 00050010-10040100Wii U Menu (EUR) - 00050010-10040200- If you are on an Australian console, select the European Wii U Menu.
- Confirm the selection if it hasn't been already confirmed.
- Once you're back at the main menu, shutdown the console.

Uninstalling CBHC after recovering from a brick
You may tell yourself why you couldn't use the CBHC uninstall guide on the main page.
Well, basically, there's no HBL anymore.
- Navigate to system settings and Data Management.
- Go to wherever Haxchi was injected (generally your internal memory)
- Uninstall the app. It is completely safe to do so as you are not automatically booting into CBHC anymore.
And there you go! You've successfully unbricked your Wii U and uninstalled CBHC.
You can now format your SD Card following this guide to delete any CBHC traces. Don't forget to backup anything important.
Follow this guide to install Aroma and optionally Tiramisu if you ever need to run older homebrew!