
Wii U:Recovering from a CBHC brick: Difference between revisions
From Hacks Guide Wiki
More actions
Made the whole guidee and integrated an image (images are left to be added) |
mNo edit summary |
||
| Line 6: | Line 6: | ||
*<big>An SD Card compatible with a Wii U (the one that you should have</big> | *<big>An SD Card compatible with a Wii U (the one that you should have</big> | ||
== <big>Files to download</big> == | ==<big>Files to download</big>== | ||
* <big>UDPIH for your appropriate device (see [https://github.com/GaryOderNichts/udpih/releases supported devices])</big> | *<big>UDPIH for your appropriate device (see [https://github.com/GaryOderNichts/udpih/releases supported devices])</big> | ||
** [https://github.com/GaryOderNichts/udpih/releases <big>https://github.com/GaryOderNichts/udpih/releases/latest</big>] | **[https://github.com/GaryOderNichts/udpih/releases <big>https://github.com/GaryOderNichts/udpih/releases/latest</big>] | ||
* <big>If you are using a Nintendo Switch, please download it using this link instead.</big> | *<big>If you are using a Nintendo Switch, please download it using this link instead.</big> | ||
** [https://github.com/GaryOderNichts/udpih_nxpayload <big>https://github.com/GaryOderNichts/udpih_nxpayload/releases/latest</big>] | **[https://github.com/GaryOderNichts/udpih_nxpayload <big>https://github.com/GaryOderNichts/udpih_nxpayload/releases/latest</big>] | ||
* <big>Recovery_Menu</big> | *<big>Recovery_Menu</big> | ||
** <big>https://github.com/GaryOderNichts/recovery_menu/releases</big> | **<big>https://github.com/GaryOderNichts/recovery_menu/releases</big> | ||
** <big>If you don't get any TV output during this guide, please download <code>recovery_menu_dc_init</code> instead and rename it to <code>recovery_menu</code></big> | **<big>If you don't get any TV output during this guide, please download <code>recovery_menu_dc_init</code> instead and rename it to <code>recovery_menu</code></big> | ||
== <big>SD Preparation</big> == | ==<big>SD Preparation</big>== | ||
# <big>Put the downloaded <code>recovery_menu</code> on the root of the SD Card.</big> | #<big>Put the downloaded <code>recovery_menu</code> on the root of the SD Card.</big> | ||
== <big>Flash UDPIH to your device</big> == | ==<big>Flash UDPIH to your device</big>== | ||
=== <big>If you are using a Pi Pico / Pico 2 / Any supported device that isn't a Switch</big> === | ===<big>If you are using a Pi Pico / Pico 2 / Any supported device that isn't a Switch</big>=== | ||
# <big>Flash the appropriate file to the appropriate device. '''This part of the guide will be focusing on the Pi Pico 1 and 2 but any Linux based device with USB emulation should work.'''</big> | #<big>Flash the appropriate file to the appropriate device. '''This part of the guide will be focusing on the Pi Pico 1 and 2 but any Linux based device with USB emulation should work.'''</big> | ||
# <big>Hold the BOOTSEL button of your Pico while plugging it into the PC. It will show up as a flash drive with the following name: <code>RPI-RP2</code></big> | #<big>Hold the BOOTSEL button of your Pico while plugging it into the PC. It will show up as a flash drive with the following name: <code>RPI-RP2</code></big> | ||
# <big>Drag and drop the correct .uf2 file inside of your Pico. Disconnect it and it will reboot. '''Do not turn it off from now on.'''</big> | #<big>Drag and drop the correct .uf2 file inside of your Pico. Disconnect it and it will reboot. '''Do not turn it off from now on.'''</big> | ||
=== <big>If you are using a modded Nintendo Switch (vulnerable to RCM)</big> === | ===<big>If you are using a modded Nintendo Switch (vulnerable to RCM)</big>=== | ||
# <big>Open any RCM injector of your choice (the most popular ones are TegraRCMGui, JTegraNX and CrystalRCM).</big> | #<big>Open any RCM injector of your choice (the most popular ones are TegraRCMGui, JTegraNX and CrystalRCM).</big> | ||
# <big>Put your switch into RCM mode</big> | #<big>Put your switch into RCM mode</big> | ||
# <big>Choose the .bin file for your Nintendo Switch and hit inject.</big> | #<big>Choose the .bin file for your Nintendo Switch and hit inject.</big> | ||
# <big>A new screen should pop up with multiple buttons from a list. To select something, press Power. To navigate around, press the volume buttons.</big> | #<big>A new screen should pop up with multiple buttons from a list. To select something, press Power. To navigate around, press the volume buttons.</big> | ||
== <big>On the Wii U</big> == | ==<big>On the Wii U</big>== | ||
# <big>Put the SD Card</big> <big>containing the <code>recovery_menu</code> at the root of it. It must be formatted in FAT32. [[Formatting an SD card|Follow this guide to format it correctly]].</big> | #<big>Put the SD Card</big> <big>containing the <code>recovery_menu</code> at the root of it. It must be formatted in FAT32. [[Formatting an SD card|Follow this guide to format it correctly]].</big> | ||
# <big>If you are using a Nintendo Switch, it is now time to Run the UDPIH gadget.</big> | #<big>If you are using a Nintendo Switch, it is now time to Run the UDPIH gadget.</big> | ||
# <big>Power on the Wii U. As soon as you see the Wii U logo, plug in the UPDIH device. It may take multiple tries, be patient.</big> | #<big>Power on the Wii U. As soon as you see the Wii U logo, plug in the UPDIH device. It may take multiple tries, be patient.</big> | ||
# <big>As soon as the light is purple, you should be good to go. The menu should've loaded but if you get a distorted screen or even no TV output, retry it. If still nothing, download <code>recovery_menu_dc_init</code> as said in the 3rd step of Files to download.</big>[[File:Main menu of Recovery Menu by GaryOderNichts.png|thumb|Main menu of Recovery_Menu.Credits to GaryOderNichts for this screenshot.Click the image to zoom!]] | #<big>As soon as the light is purple, you should be good to go. The menu should've loaded but if you get a distorted screen or even no TV output, retry it. If still nothing, download <code>recovery_menu_dc_init</code> as said in the 3rd step of Files to download.</big>[[File:Main menu of Recovery Menu by GaryOderNichts.png|thumb|Main menu of Recovery_Menu.Credits to GaryOderNichts for this screenshot.Click the image to zoom!]] | ||
# <big>Unlike in the minute menu, to navigate, you should use Eject and Power to select/choose an option.</big> | #<big>Unlike in the minute menu, to navigate, you should use Eject and Power to select/choose an option.</big> | ||
# <big>Select the <code>Set Coldboot Title</code> option.</big> | #<big>Select the <code>Set Coldboot Title</code> option.</big> | ||
# <big>You should now see multiple options to set as your Coldboot title (which basically means what you want to boot to).</big> | #<big>You should now see multiple options to set as your Coldboot title (which basically means what you want to boot to).</big> | ||
# <big>Select the Wii U Menu of your appropriate console region:</big> | #<big>Select the Wii U Menu of your appropriate console region:</big> | ||
#* <code><big>Wii U Menu (JPN) - 00050010-10040000</big></code> | #*<code><big>Wii U Menu (JPN) - 00050010-10040000</big></code> | ||
#* <code><big>Wii U Menu (USA) - 00050010-10040100</big></code> | #*<code><big>Wii U Menu (USA) - 00050010-10040100</big></code> | ||
#* <code><big>Wii U Menu (EUR) - 00050010-10040200</big></code> | #*<code><big>Wii U Menu (EUR) - 00050010-10040200</big></code> | ||
# <big>Confirm the selection if it hasn't been already confirmed.</big> | #<big>Confirm the selection if it hasn't been already confirmed.</big> | ||
# <big>Once you're back at the main menu, shutdown the console.</big> | #<big>Once you're back at the main menu, shutdown the console.</big> | ||
== <big>Congrats!</big> == | ==<big>Congrats!</big>== | ||
=== <big>You've successfully recovered your Wii U from a CBHC brick! Now, go to https://wiiu.hacks.guide/uninstall-cbhc.html to uninstall it completely and install Aroma!</big> === | ===<big>You've successfully recovered your Wii U from a CBHC brick! Now, go to https://wiiu.hacks.guide/uninstall-cbhc.html to uninstall it completely and install Aroma!</big>=== | ||
[[Category:Wii U guides]] | [[Category:Wii U guides]] | ||
[[Category:Wii U]] | [[Category:Wii U]] | ||
[[Category: | [[Category:Wii U homebrew]] | ||
Revision as of 22:06, 15 May 2026
Recovering from a CBHC brick
Requirements
- Preferably a modded Switch or Raspberry Pi Pico (see supported devices on the UDPIH page)
- A PC (preferably Windows but I think you can use any OS)
- An SD Card compatible with a Wii U (the one that you should have
Files to download
- UDPIH for your appropriate device (see supported devices)
- If you are using a Nintendo Switch, please download it using this link instead.
- Recovery_Menu
- https://github.com/GaryOderNichts/recovery_menu/releases
- If you don't get any TV output during this guide, please download
recovery_menu_dc_initinstead and rename it torecovery_menu
SD Preparation
- Put the downloaded
recovery_menuon the root of the SD Card.
Flash UDPIH to your device
If you are using a Pi Pico / Pico 2 / Any supported device that isn't a Switch
- Flash the appropriate file to the appropriate device. This part of the guide will be focusing on the Pi Pico 1 and 2 but any Linux based device with USB emulation should work.
- Hold the BOOTSEL button of your Pico while plugging it into the PC. It will show up as a flash drive with the following name:
RPI-RP2 - Drag and drop the correct .uf2 file inside of your Pico. Disconnect it and it will reboot. Do not turn it off from now on.
If you are using a modded Nintendo Switch (vulnerable to RCM)
- Open any RCM injector of your choice (the most popular ones are TegraRCMGui, JTegraNX and CrystalRCM).
- Put your switch into RCM mode
- Choose the .bin file for your Nintendo Switch and hit inject.
- A new screen should pop up with multiple buttons from a list. To select something, press Power. To navigate around, press the volume buttons.
On the Wii U
- Put the SD Card containing the
recovery_menuat the root of it. It must be formatted in FAT32. Follow this guide to format it correctly. - If you are using a Nintendo Switch, it is now time to Run the UDPIH gadget.
- Power on the Wii U. As soon as you see the Wii U logo, plug in the UPDIH device. It may take multiple tries, be patient.
- As soon as the light is purple, you should be good to go. The menu should've loaded but if you get a distorted screen or even no TV output, retry it. If still nothing, download
recovery_menu_dc_initas said in the 3rd step of Files to download.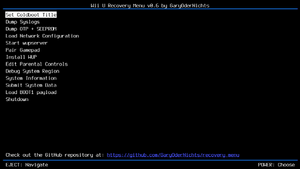
Main menu of Recovery_Menu.Credits to GaryOderNichts for this screenshot.Click the image to zoom! - Unlike in the minute menu, to navigate, you should use Eject and Power to select/choose an option.
- Select the
Set Coldboot Titleoption. - You should now see multiple options to set as your Coldboot title (which basically means what you want to boot to).
- Select the Wii U Menu of your appropriate console region:
Wii U Menu (JPN) - 00050010-10040000Wii U Menu (USA) - 00050010-10040100Wii U Menu (EUR) - 00050010-10040200
- Confirm the selection if it hasn't been already confirmed.
- Once you're back at the main menu, shutdown the console.
